Working with Scanned Point Clouds and PLY files
How can I view my scans (OBJ Color Mesh Files)?
ASCAND uses Vertex Coloring to limit the amount of files needed. You can use MeshLab to open ASCAND OBJ files and convert them into anything you like.
The outer shell of the 3D-scan looks great. How can I get rid of the nasty holes at the top and at the bottom?
You can use ASCANDs multi scans and simply select multiple ScanVideos (upright, sideways, etc.) when uploading them to your myascand.xplicator.com account. You will get all individual scan results PLUS a point cloud containing a MERGED version of all files uploaded in your multi-scan. If you like to fine tune the results you can use our browser based multi scan merge editor that gives you a powerful and easy-to-use toolset to align and merge up to 4 scans.
Of course you could also take 2 scans – one upright, one sideways – and combine them through MeshLab, CloudCompare or similar software. YouTube has some useful tutorials on this. This is on meshing, and the second part (starting at minute 10:30) of this is on gluing. Or simply google for “meshlab point based gluing”.
How can I print my scans (or have it printed)?
You need a so called “watertight mesh” to use it with a 3D printer. The STL file format is widely used for this purpose.
All paid ASCAND plans generate these meshes automatically and send them to your myascand.xplicator.com account at the end of every 3D-scan you make.
Community Edition users can manually convert the “point cloud” into a mesh. There are some great tutorials how to convert a point cloud into a mesh using the free Meshlab program.
Since this process is pretty computing intensive, we are currently not offering automated STL generation for the Community Subscription to protect the availability of our ASCAND Community Servers.
Once you have an STL file it is easy to “slice” these the GCODE that can be interpreted by a 3D printer.
There are a lot of free options for slicers out there.
How can I view my scans (PLY files)?
The ASCAND generates the widely used 3D-point cloud format PLY. There is a myriad of viewers and converters for this format. As always Wikipedia is a great source of information. Two of our favorites are MeshLab and CloudCompare.
DO NOT use the Windows 10 3D Viewer, as it ONLY supports meshes and has no support for native point clouds.
General Questions
Why do you use Mini-USB and not USB-C?
Convenience, reusability, and cost. The ASCAND ONLY uses USB to power the turn table. No data transfer. Mini-USB power is widely available and affordable.
Why don’t you include batteries in the package?
This is not a cost issue. It is a regulative/customs/shipment issue. We currently ship ALL of our products from Germany. And there are literally hundreds of regulations related to importing products including batteries for every country on this planet. We do not want your complete package to be stuck in your local customs office just because we threw in $1 worth of batteries you probably have at home.
Is there a quick tutorial video of a complete ASCAND 3D scan process?
Yes. It is available at https://youtu.be/5Wt03zm88cg …
Is the ASCAND intended for Indoor or Outdoor use?
If you are doing lower res scans without using the ASCAND laser module, you can try your luck in stable lighting conditions in the wild.
While ASCAND is supporting stronger lasers for OUTDOOR operation, all ASCAND Laser Kits offered on this site are intended for INDOOR use.
On this site, we are not offering Laser Modules stronger than Class IIIa with our ASCAND Kits for safety and regulatory considerations.
Is the Laser Module used by the ASCAND Kit a toy? If not, is it dangerous?
The Laser Module ASCAND uses is NO TOY! It falls into the LASER Class IIIa.
The FDA concludes that “… The risk of injury is very small when Class IIIa pointers are used responsibly …” and states:
“Class IIIa or IEC Class 3R lasers can be dangerous. Class IIIa lasers can cause temporary visual effects such as flash blinding, which could distract or startle the person exposed. The risk of injury is very small when Class IIIa pointers are used responsibly because natural body motion of a person holding the pointer or motion of a person who might be exposed makes it difficult to expose the eyes for a long period of time. People also have a natural aversion to bright lights and are likely to close their eyes and turn their heads if exposed.”
The original FDA document can be found here.
Is my phone data safe?
Your data is safe. We don’t and cannot access anything but your actively uploaded ScanVideos.
What is the benefit of using LASER scanning vs. LIDAR that some Apple iPhone 3D-Scan-Apps are using?
One word: Precision
The latest Apple PRO iPhones have a true TOF 3D LiDAR scanner (depth) built in. LIDAR 3D precision is much lower than laser precision. While LASER 3D scans typically start at a 0.2mm resolution, LIDAR scans typicalls start at 10mm making LASER scans 50+ times more accurate.
How come ASCAND 3D Models are so colorful when you are using laser triangulation?
We have developed a special technology that removes the “color weakness” of traditional laser triangulation algorithms. By simply switching off the laser after its first rotation the ASCAND matches the “untainted” colors of the second rotation to colorize the models. It works like a multicolored charm.
What is the benefit of using laser scanning vs. Photogrammetry “image-stitching” that most 3D-Scan-Apps are using?
One Word: Precision.
Photogrammetry (aka “Image-Stitching”) relies on 100+ photos taken of the object you wish to model. It does not require or have a depth sensor. The algorithm then tries to identify “features” that allows it to derive the camera position from each image.
Due to the very limited accuracy Photogrammetry is mostly used in large scale scans for outdoor applications such as geoscience, surveying, and historical architecture. It is a good fit if you do not require great accuracy and are relying on “texture” to give you the sensation of structure.
The latest iPhones have a true TOF 3D LiDAR scanner (depth) built in . Its precision is much lower than laser scans (about 1 to 10 cm).
How long does it take to put the ASCAND 3D Scanner together? What tools do I need? Is it portable?
The ASCAND is completely portable and operational in 120 seconds.
All it takes is to put in the laser holder, place the turn table into the bracket, switch the laser on and you are scanning.
No tools or prior experience needed. Take a look at our unboxing video to see it all.
What resolution and what file format can I expect for my 3D model?
The supported resolutions currently available on the myascand.xplicator.com page range from 1mm to 0.1mm.
The output file is a high resolution color point cloud in the widely supported PLY format. You can use CloudCompare, MeshLab, or other applications to further process or convert your point clouds into other 3D model files.
The ASCAND also supports “auto-meshing” of point clouds to deliver STL files for 3D printing and OBJ files for color models.
Does the ASCAND support color?
Yes – the ASCAND delivers High Resolution Color Point Clouds using the widely supported PLY format.
ASCAND also supports generating color meshes with vertex colors (OBJ files).
Is the ASCAND service FREE, or do you charge for your service?
ASCAND Scans are processed using Credits.
But worry not – to keep the basic use of ASCAND free for the occasional, personal user we are posting a bunch of FREE credits to your myascand.xplicator.com when you register.
So if you have your electronics, print your scanner on a local 3D-printer, and use it to produce occasional non-commercial stuff – we don’t take your money and it is completely free for you.
What camera / mobile phone model can I use for the 3D-scan process?
You phone camera needs to take good quality Full HD Videos with 30fps. That’s it.
Pretty much all of today’s reasonable iOS and Android smartphones fall into this category.
Do I need to download a specific App?
No, it is not necessary to clutter your phone with yet another App.
The ASCAND web app is developed using the latest mobile web technologies and just requires a current web browser to work. Just take a 60 second video with your favorite camera app on your phone and upload it to your FREE myascand.xplicator.com account.
If you love adding another app to your phone, you can get our Android App here. Its iOS sibling will follow soon.
How can I get in contact with customer support?
Just send us an eMail to ascand@xplicator.com.
Is the ASCAND technically inferior? How can you offer it at such a low price?
The ASCAND is technically on-par or better than most products that are costing 100s or 1000s of dollars.
The most expensive pieces of an advanced 3D-scanner are the cameras and the computing power it takes to process the scan.
Since the ASCAND is using the advanced camera of your smart phone and the computing power provided by the cloud, it takes the most expensive parts out of the equation.
How does it work?
The ASCAND is a combination of a laser, a turn table, a web site, and a Cloud based backbone that does the number crunching.
You take a ScanVideo of the object on an ASCAND scanner turn table using your favorite video app on your phone.
Then, upload it to your FREE myascand.xplicator.com account .
When the processing is done, you receive an eMail to download your 3D model.
The point cloud files are also added to your myascand.xplicator.com account after processing.
You can login to your account at any time and download the files for further processing, if needed.
Getting the ASCAND
Why do you use Mini-USB and not USB-C?
Convenience, reusability, and cost. The ASCAND ONLY uses USB to power the turn table. No data transfer. Mini-USB power is widely available and affordable.
Why don’t you include batteries in the package?
This is not a cost issue. It is a regulative/customs/shipment issue. We currently ship ALL of our products from Germany. And there are literally hundreds of regulations related to importing products including batteries for every country on this planet. We do not want your complete package to be stuck in your local customs office just because we threw in $1 worth of batteries you probably have at home.
Is the Laser Module used by the ASCAND Kit a toy? If not, is it dangerous?
The Laser Module ASCAND uses is NO TOY! It falls into the LASER Class IIIa.
The FDA concludes that “… The risk of injury is very small when Class IIIa pointers are used responsibly …” and states:
“Class IIIa or IEC Class 3R lasers can be dangerous. Class IIIa lasers can cause temporary visual effects such as flash blinding, which could distract or startle the person exposed. The risk of injury is very small when Class IIIa pointers are used responsibly because natural body motion of a person holding the pointer or motion of a person who might be exposed makes it difficult to expose the eyes for a long period of time. People also have a natural aversion to bright lights and are likely to close their eyes and turn their heads if exposed.”
The original FDA document can be found here.
Is the ASCAND service FREE, or do you charge for your service?
ASCAND Scans are processed using Credits.
But worry not – to keep the basic use of ASCAND free for the occasional, personal user we are posting a bunch of FREE credits to your myascand.xplicator.com when you register.
So if you have your electronics, print your scanner on a local 3D-printer, and use it to produce occasional non-commercial stuff – we don’t take your money and it is completely free for you.
Why do I have to get the Block Code Tape from you? Can’t I just print it on my large scale printer?
The algorithms of the ASCAND platform heavily rely on the pattern quality of the Block Code Tape. To ensure best results and allow easy & reliable application to the Turn Table, we have chosen a specially coated high quality foil to provide the best optical durability and contrast possible.
This is the only piece you need to get directly from us. Everything else you can get where ever you want.
How much does it cost to ship to my country if I buy from you?
Shipment depends on the country you are shipping to and the service you are selecting during check-out. It is shown in the check-out process before you make your payment.
Import duties, tax, or whatever your local authorities might charge is yours.
How long does it take to ship?
The 3D-printable STL-files are available for immediate download.
If you order physical goods from our site, all components are shipped via the service you are selecting in your check-out process.
The estimated shipping times are dependent on your location and the service you are selecting. They are shown before you make your payment.
I don’t have a 3D-Printer but would like to 3D print the ASCAND 3D scanner components locally. Is there any place I can go?
There are many excellent 3D printing services available everywhere on the planet. A good list to start is here.
Where can I get the parts for the ASCAND MAKER Edition that I can’t 3D-print?
You can get a complete pre-packaged box directly from our website, at your favorite local store, or at AMAZON™ .
Click here for information where and how you can get all parts for the ASCAND 3D Scanning platform.
3D Scanning
Is there a quick tutorial video of a complete ASCAND 3D scan process?
Yes. It is available at https://youtu.be/5Wt03zm88cg …
Is the ASCAND intended for Indoor or Outdoor use?
If you are doing lower res scans without using the ASCAND laser module, you can try your luck in stable lighting conditions in the wild.
While ASCAND is supporting stronger lasers for OUTDOOR operation, all ASCAND Laser Kits offered on this site are intended for INDOOR use.
On this site, we are not offering Laser Modules stronger than Class IIIa with our ASCAND Kits for safety and regulatory considerations.
Is the Laser Module used by the ASCAND Kit a toy? If not, is it dangerous?
The Laser Module ASCAND uses is NO TOY! It falls into the LASER Class IIIa.
The FDA concludes that “… The risk of injury is very small when Class IIIa pointers are used responsibly …” and states:
“Class IIIa or IEC Class 3R lasers can be dangerous. Class IIIa lasers can cause temporary visual effects such as flash blinding, which could distract or startle the person exposed. The risk of injury is very small when Class IIIa pointers are used responsibly because natural body motion of a person holding the pointer or motion of a person who might be exposed makes it difficult to expose the eyes for a long period of time. People also have a natural aversion to bright lights and are likely to close their eyes and turn their heads if exposed.”
The original FDA document can be found here.
Do I have to “calibrate” ASCAND for my phone and – if so – how do i do it?
You don’t have to calibrate ASCAND for your phone as ASCAND comes with an out-of-the-box standard calibration, that will produce good results with the vast majority of all supported phones.
If you are experiencing distortions in your 3D models, they are most likely due to the distortion characteristics of the camera optics built into your phone.
To address this, we have added a standard calibration process to analyze your phones “distortion matrix” and apply it to the Scan Videos you are processing.
While the technology is sophisticated, the process is very simple and very straight forward:
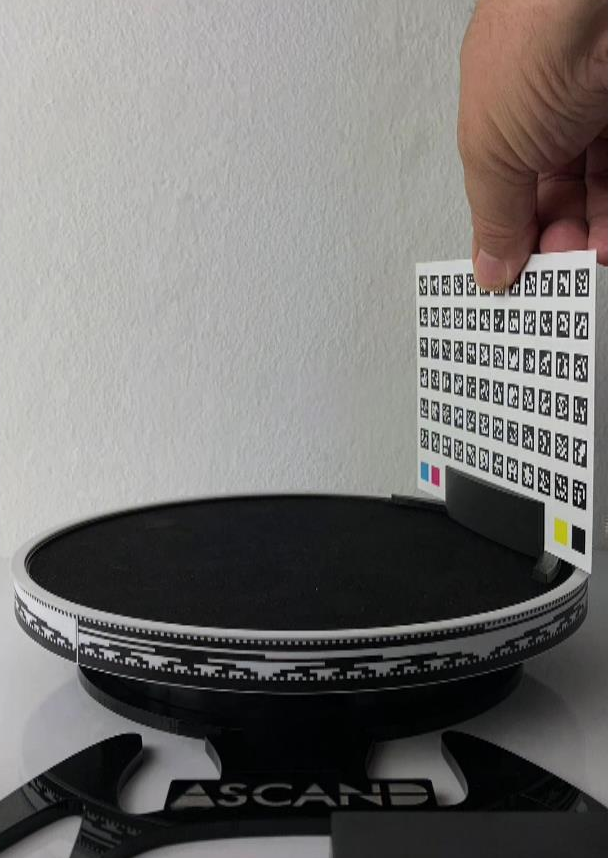
Put the Calibration Card into by the Calibration Card Holder that came with your ASCAND.
Make sure the Calibration Card is centered in the Calibration Card Holder and the Laser is switched OFF
Place it on the edge of the turn table
Take a ScanVideo at the slowest Turn Table speed for a MINIMUM OF 60 seconds.
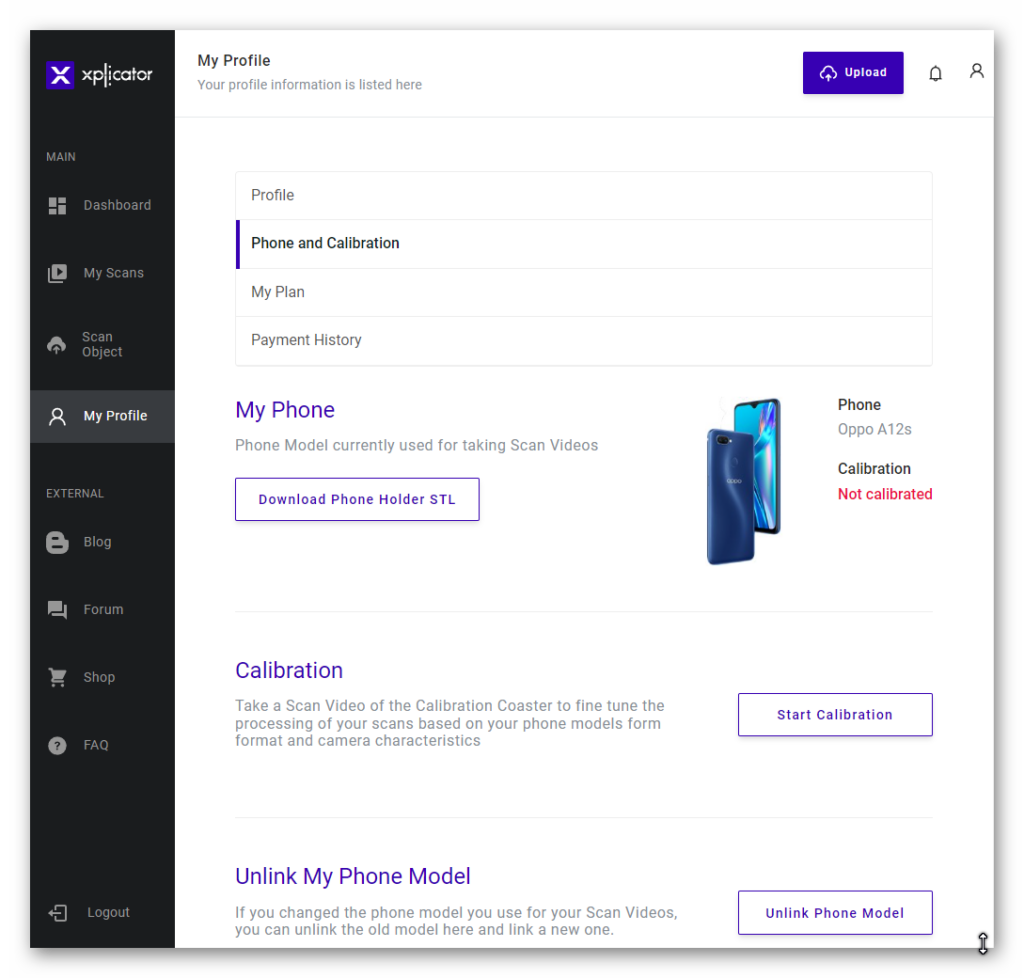
Upload the Calibration ScanVideo to your ASCAND dashboard by clicking on “Start Calibration” in your Profile Section.
ASCAND will analyze it and apply your phone’s specific “distortion matrix” to your future scans.
Done.
.
What is the benefit of using LASER scanning vs. LIDAR that some Apple iPhone 3D-Scan-Apps are using?
One word: Precision
The latest Apple PRO iPhones have a true TOF 3D LiDAR scanner (depth) built in. LIDAR 3D precision is much lower than laser precision. While LASER 3D scans typically start at a 0.2mm resolution, LIDAR scans typicalls start at 10mm making LASER scans 50+ times more accurate.
How come ASCAND 3D Models are so colorful when you are using laser triangulation?
We have developed a special technology that removes the “color weakness” of traditional laser triangulation algorithms. By simply switching off the laser after its first rotation the ASCAND matches the “untainted” colors of the second rotation to colorize the models. It works like a multicolored charm.
What resolution and what file format can I expect for my 3D model?
The supported resolutions currently available on the myascand.xplicator.com page range from 1mm to 0.1mm.
The output file is a high resolution color point cloud in the widely supported PLY format. You can use CloudCompare, MeshLab, or other applications to further process or convert your point clouds into other 3D model files.
The ASCAND also supports “auto-meshing” of point clouds to deliver STL files for 3D printing and OBJ files for color models.
Does the ASCAND support color?
Yes – the ASCAND delivers High Resolution Color Point Clouds using the widely supported PLY format.
ASCAND also supports generating color meshes with vertex colors (OBJ files).
What Video Formats are supported by the ASCAND Upload Page?
The ASCAND Upload Page accepts Full-HD-Videos using the standard Format MP4 (H.264) used by Android and iOS Phones.
Is there a simple 1-2-3 check making sure that the video settings are good?
The better the Phone, the easier this is.
A good setup is when:
- You have focused your camera on the closest portion of the Block Code Tape and clearly see the Block Code Tape with no blurring as it moves
- You can see the laser beam (with its center turning slightly white) when it hits the Turn Table Sleeve Ring with the Block Code Tape. It needs to completely cover the height of the sleeve.
- You can see the laser beam hitting the object
My 3D-scan fails or the quality is bad. How can I improve?
The eMail notifying you of the failure of your scan will have specific information on your scan.
However, the most common reasons for a failed or bad scan are:
Too much surrounding light or backlight
Try to establish an environment with 10-50 LUX and the light coming from behind without throwing a shadow on the Block Code Tape or the Turn Table.
You can measure the brightness (LUX) by using one of these free apps:
iOS: LUX Light Meter Pro
Android: LUX Light Meter
A comprehensive list of light metering apps can be found here.
AVOID Backlight. Always have the light coming from behind.
AVOID Direct Sunlight.
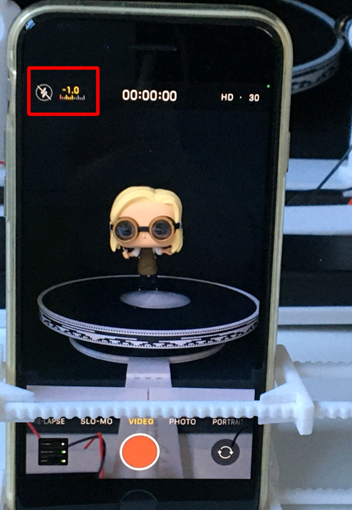
DISABLE automatic light correction/exposure on your phone.
On iOS:
Go into Settings -> Camera -> Preserve Settings -> Exposure Adjustment
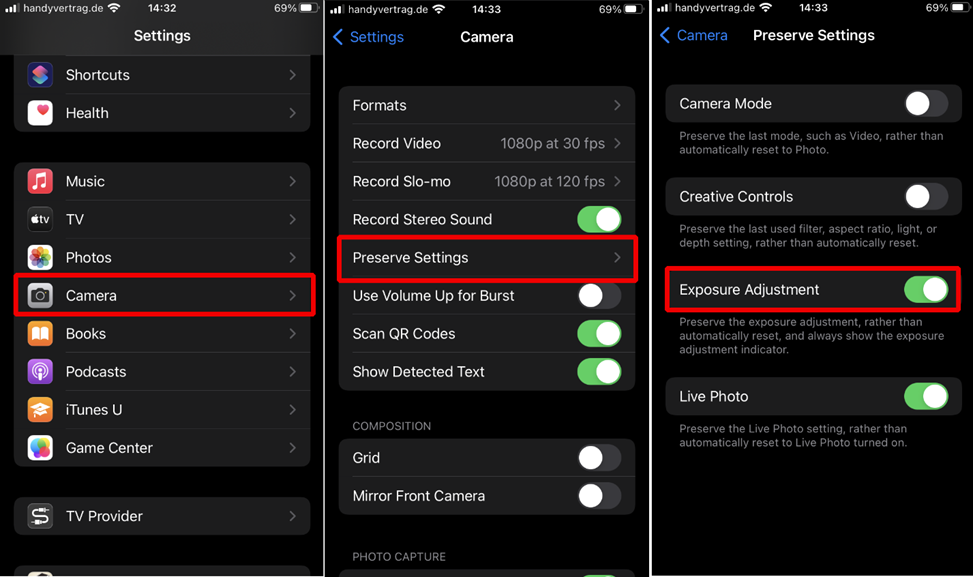
After making these changes your camera will show the exposure settings while you are recording your video. The Screenshot shows a -1 Setting that we have been successfully working with.
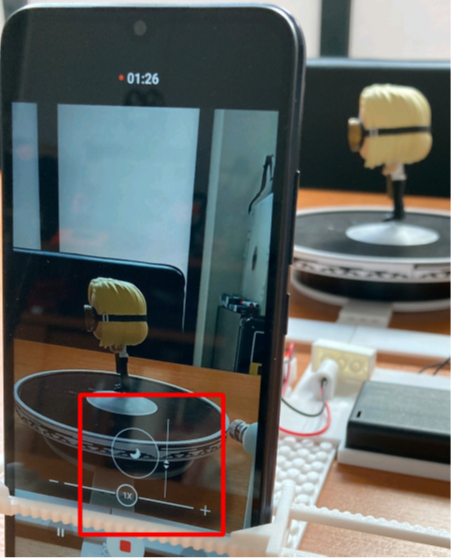
On Android:
Tap in the middle of Turn Table Sleeve Ring with the Block Code Tape and drag your finger vertically to set the desired camera exposure:
Make sure that you have a surrounding light of about 10 – 50 Lux and there is no significant variation in lighting. If you have too much light and can’t get rid of it, try using a GRAY IKEA DRÖNA box and put your turn table into it while scanning. Also make sure that there no shadows are thrown at the block tape.
Too little surrounding light
If things are too dark where you scan. Again – shoot for about 10-50 Lux when using a standard 5mW laser.
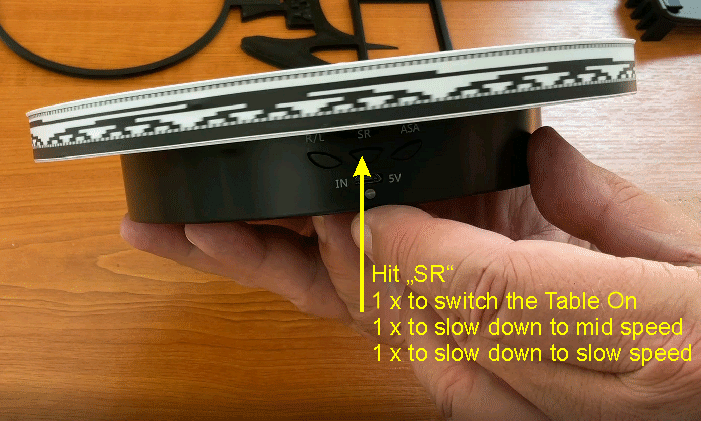
Set your Turn Table to SLOW speed and make sure it rotates clockwise
The Turn has 3 speeds it can operate on. Set it to the slowest speed and make sure that it turns clockwise.
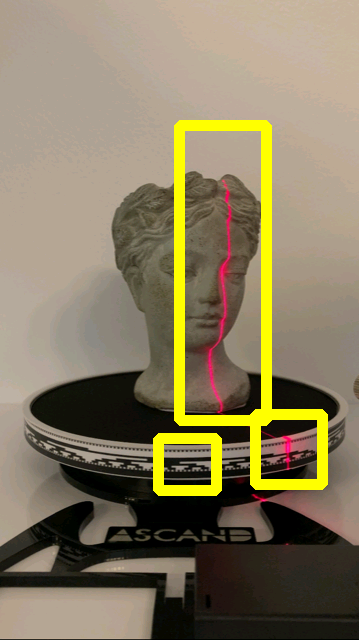
Camera Focus is not on the Object on the Turn Table
A lot of mobile phones allow to manually set the camera focus by tapping on the area you wish to focus on. Make sure your focus is on the Turn Table Sleeve that is closest to your phone by tapping on that part of the image before recording.
If your video looks like this
· Clearly visible Laser Line on Scan Object
· Clearly visible Laser Line on Block Code Tape
· Camera Focus on the Object on the Turn Table NOT ON THE BACKGROUND
you should be OK:

Busy Background
As some of ASCAND algorithms rely on background removal, make sure no one walks through your video when you record. Always have stable lighting and background conditions while taking the scan video.
Vibrations of the Turn Table or the Phone
Make sure your ASCAND 3D scanner is free of vibrations while you are recording the scan video. Also make sure that no one bumps into the table the ASCAND is placed on. Also make sure that switching the Laser off during the scan process does not shake the ASCAND.
Calibrate your ASCAND 3D Scanner
The factory setting of the ASCAND is set to the most common vertical size of the Smartphones sold in 2020-23.
During the registration process you are asked for the phone you will use for recording the scan videos. This will enable our ASCAND platform to use the phones geometry for optimizing the scan.
Additionally, you can scan our Checkerboard Coaster for fine tuning the scanning process to the Phone you are using. The status of the fine tuning will be shown in your profile.
Please have a look at this video to see how easy it is to get the perfect setup.
What is the purpose of switching off the laser for the last 60 seconds and what do I need to take care of if I want to use that feature?
Better Colors, denser point clouds and fewer outliers.
The ASCAND platform is using a unique algorithm that takes advantage of laser and non-laser images for improved colors and better accuracy.
It uses advanced AI algorithms to remove the background and does some 3D image magic subtracting the stuff you don’t want and increasing it’s confidence in the voxels you do want.
When switching off the laser after 60+ seconds and recording the final 60 seconds without laser, you need to make sure there are no vibrations in the video when you operate the battery switch. So, don’t rock the boat.
It is good practice to take the battery case out of the Battery Case Holder and operate it with no direct contact to the ASCAND base structure to avoid instable video recordings.
How long should my ScanVideo be?
The minimum length of a ScanVideo needs to be 60 seconds.
Please keep in mind ASCAND can use multiple passes (oversampling) of the video to improve the scan resolution once you are going beyond draft quality.
For Standard the best combo to get started is to take a 120 second video. Starting with the laser switched on. Switching the laser off for last 60 seconds will give you best standard results.
If you want to go for Detail you can record more spins to benefit from ASCANDs oversampling capabilities. 120 seconds with laser ON and the remaining 60 seconds with laser OFF will get you a good start.
Why are you using such a low powered 5mW laser module for the ASCAND? Can we use a stronger laser?
Technically you can use the ASCAND 3D scanner with much stronger red and green lasers. For safety reasons we have decided to ship the product with a laser not exceeding Laser Class 3A. Our enterprise subscriptions support a selection of stronger lasers.
What settings should my smartphone camera have to get good scan results?
Since the standard ASCAND 3D scanner is designed to operate on a very low power safe 5mW Laser, the room should not be too bright for the laser to be visible on the video.
When uploading your ScanVideo the ASCAND Platform checks the quality of it. It will give you detailed information on what to imporove, if your scan needs an improved environment.
Typically you should have the surrounding light to be at around 10-75 LUX when working with the standard 5mW laser.
The rule of thumb is to set the focus of the camera on the turn table sleeve ring to give your ASCAND the best possible quality Block Code Tape reading. Also make sure it is not too dark for the white on the block code tape to turn “blueish”
When using an iPhone it is best to set the video brightness to -1 in the camera app. You can measure the surrounding with the “LightMeter”-App available in the AppStore.
When using Android you need to manually adjust the brightness by taping on the block code tape to set the focus. Then slide your finger down to turn down the brightness of the recording.
What camera / mobile phone model can I use for the 3D-scan process?
You phone camera needs to take good quality Full HD Videos with 30fps. That’s it.
Pretty much all of today’s reasonable iOS and Android smartphones fall into this category.
Do I need to download a specific App?
No, it is not necessary to clutter your phone with yet another App.
The ASCAND web app is developed using the latest mobile web technologies and just requires a current web browser to work. Just take a 60 second video with your favorite camera app on your phone and upload it to your FREE myascand.xplicator.com account.
If you love adding another app to your phone, you can get our Android App here. Its iOS sibling will follow soon.
Assembling the ASCAND
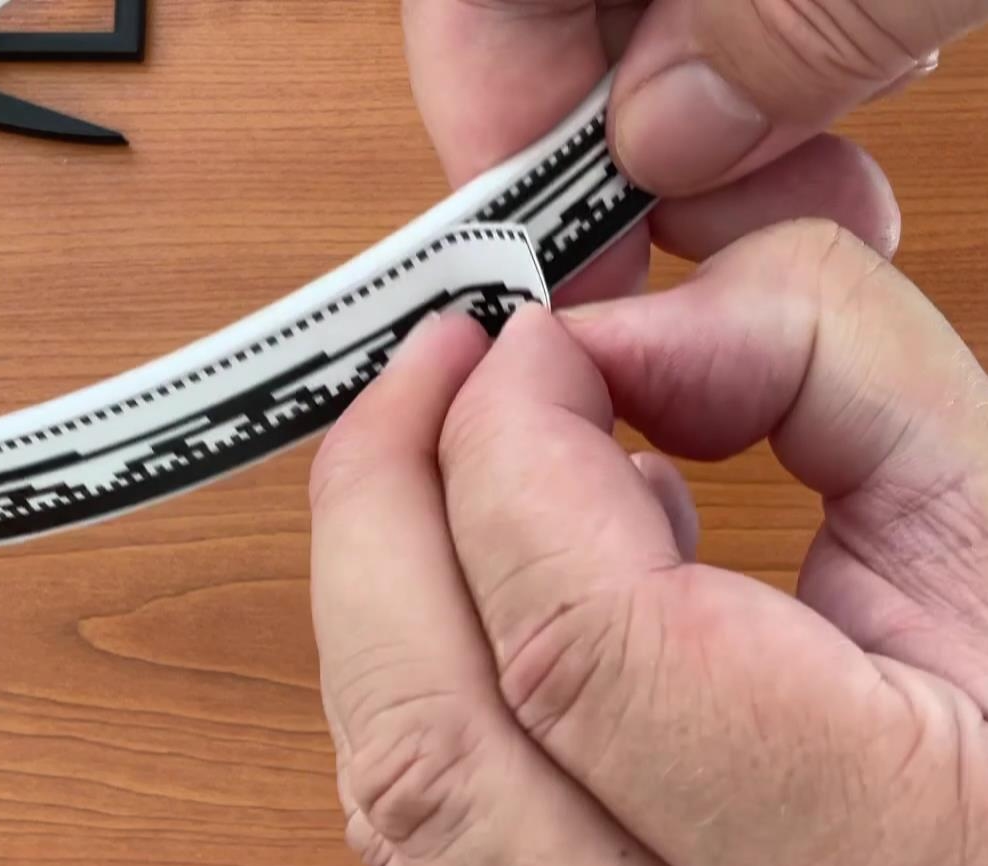
Is my Block Code Tape too long? Does it matter which overlapping side goes “on top”? Does it matter what part the upper and what the lower part is?
The Block Code Tape is designed to overlap. However, it is VERY IMPORTANT that you apply it Left-Over-Right. Also, the solid black stripe needs to be on the LOWER side of the sleeve. When you finalize attaching your Block Code Tape, it should look something like this:
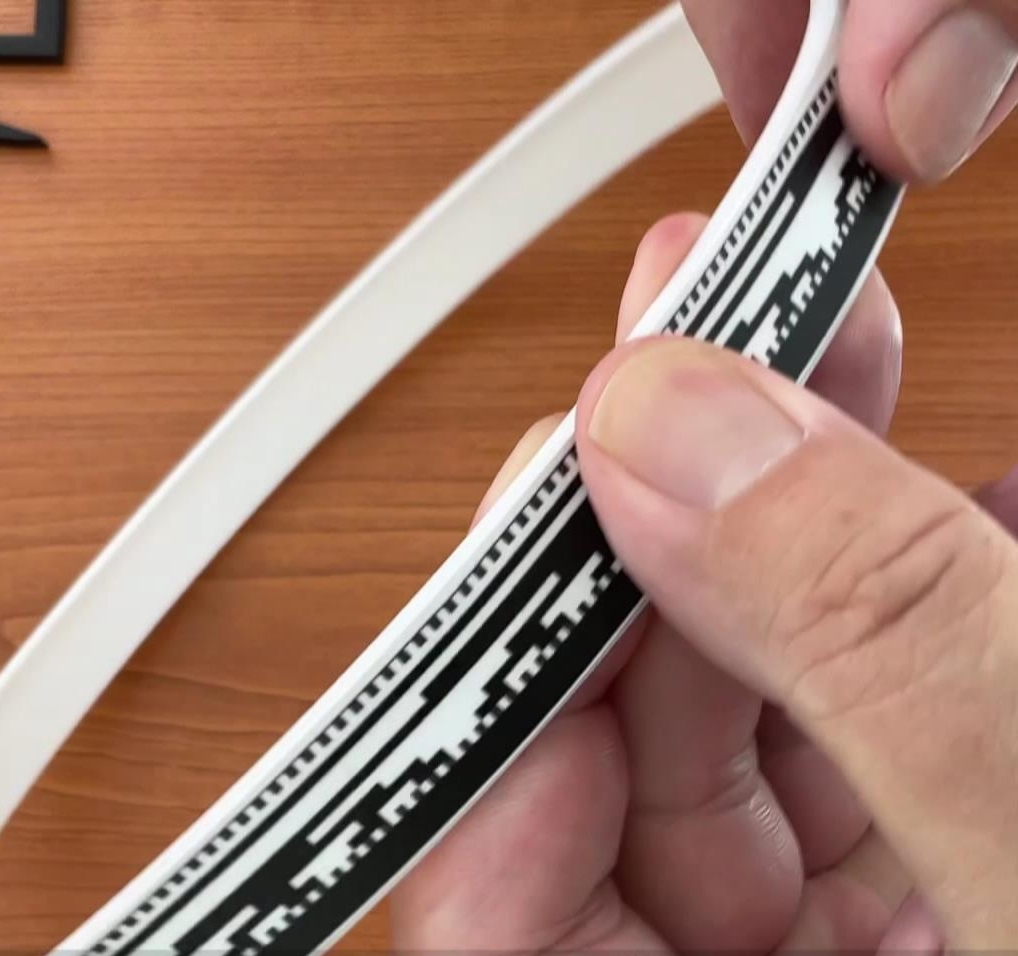
The Block Code Tape is heavily utilized by ASCAND’s algorithms. So taking some EXTRA CARE when applying it pays off handsomely with all your scans.
Be precise when “closing the loop”. The Block Code Tape MUST be PRECISELY ALIGNED when finalizing it “left over right”.
How long does it take to put the ASCAND 3D Scanner together? What tools do I need? Is it portable?
The ASCAND is completely portable and operational in 120 seconds.
All it takes is to put in the laser holder, place the turn table into the bracket, switch the laser on and you are scanning.
No tools or prior experience needed. Take a look at our unboxing video to see it all.
How do I assemble the 3D-printed ASCAND components?
Please watch the video tutorial for the Maker Edition. It walks you through the complete process for the 3D printed Maker Edition of the ASCAND in under 10 minutes.
3D Printing the ASCAND
How do I assemble the 3D-printed ASCAND components?
Please watch the video tutorial for the Maker Edition. It walks you through the complete process for the 3D printed Maker Edition of the ASCAND in under 10 minutes.
What colors can I 3D print my ASCAND Maker Edition in?
You can 3D-print the ASCAND scanner components in every color or multi-color of your choice. For environmental reasons and for ease of operation we recommend using PLA.
The only limitation is the turn table sleeve that IS REQUIRED to be printed in WHITE to prevent the color from shining through the block code tape.
I have problems 3D-printing the printable ASCAND components
We have tested 3D printing of our STL files on a wide selection of FDM 3D printers and services in PLA intensively.
If your 3D printer or slicer software has problems printing our models, you can find numerous blogs, videos and websites that provide 3D-print troubleshooting guides.
What 3D-printer model/type do I need to 3D-print the ASCAND Maker Edition components?
We strongly recommend printing the ASCAND 3D scanner components with PLA filament as it is eco-friendly, cost effective, and very easy to handle. Other materials are not supported for various design reasons.
The ASCAND 3D scanner is designed to be printable on build plates large enough to print 203 mm (xy) objects with a minimum height of 50mm (z). Most 3D-desktop printers are fulfilling this requirement.
You might need to deactivate the “brim” or “skirt” (or set it to 0) in your Slicers Printer Settings, if the ASCAND component (usually the turn table sleeve) you are trying to print is getting too close to the border of your build plate.
Which 3D-print parameters should I use when producing the gcode-files for my 3D-printer?
Hard to say. Every 3D-printer works with different print settings and first of all you should work with the print settings that work best for your 3D-printer. If you print PLA with standard speed and a temperature of 215C you should be good in most cases.
What software program do I need / should I use to 3D-print the downloaded STL-files?
You need a Slicer to translate STL files into the GCODE understood by your 3D printer.
While your downloaded STL-file is 3D-printer agnostic, the Slicer translates it into machine specific GCODE that is understood by your 3D printer.
Typically your 3D printer manufacturers shipp their own Slicer software or Slicer recommendation with their 3D printers. There are good reasons to stick with that.
While there are a lot of good printer agnostic “Slicers” out there, CURA is a great choice that is freely available.
A short and great comprehensive tutorial can be found here. Others can be found here