Taking the Perfect 3D Scan Video
Align well and focus!
The Scan Video alignment setup mostly needs three things:
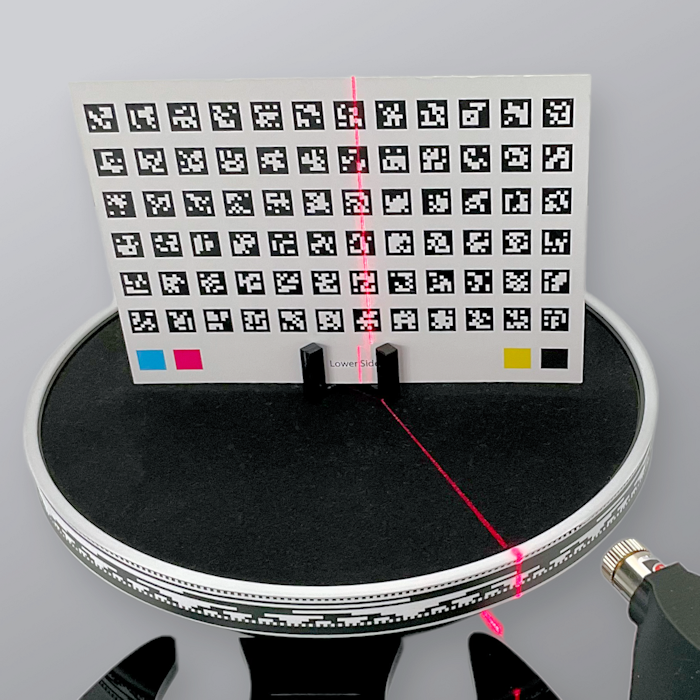
Crisp Focused Laser Line & Vertical Laser Alignment
The ASCAND processing relies on a crisp and vertical laser line. You can adjust the focus of the laser module by turning the lens ring on the Laser module.
While the initial Phone Calibration process requires the Laser to be switched OFF, the Calibration Card itself can be used here to help you to align the laser vertically.
Here is a crisp laser line the is slightly slanted to the upper right. In order to correct this, you would need to slightly turn the lens of the laser to the left until you have a well aligned and crisp vertical line.
Turn Table Alignment
Make sure that the Turn Table sits horizontally and firmly in the bracket of the ASCAND body to prevent it from being “tilted”.
Phone Alignment
Make sure the camera of the phone is horizontal (not “tilted” to the left or right side) and is perpendicular to the ASCAND axis. It needs to look straight at the center front of the Turn Table along the axis of the ASCAND body with the Turn Table completely visible and in the center of the Scan Video.
Just like this:
Here is an example Scan Video with good lighting, a clear and crisp laser line, and some explainations along the way.
Make sure that the Scan Video captures the COMPLETE Turn Table Sleeve on both sides.
If you want to learn how to shoot the perfect 3D Scan Video for your ASCAND, this 110 second video puts you on the fast track …
Dim the Flood Lights – No Spot Lights
For legal reasons we cannot ship the consumer version of ASCAND with a stronger laser than the 5mW laser module we have included. It works best in slightly dimmed flood lighting conditions (10-50 LUX). Try to avoid spot lights as they tend to throw shadows that will reduce the quality of your scan.
The Block Code needs to be visible without being “blueish” or blurred and the laser line needs to be clearly visible. Here is an FAQ with additional info.
Here are some example settings for an iPhone 12 Pro. Your phone might have different settings, but the brightness on the Scan Video should be looking something like this:
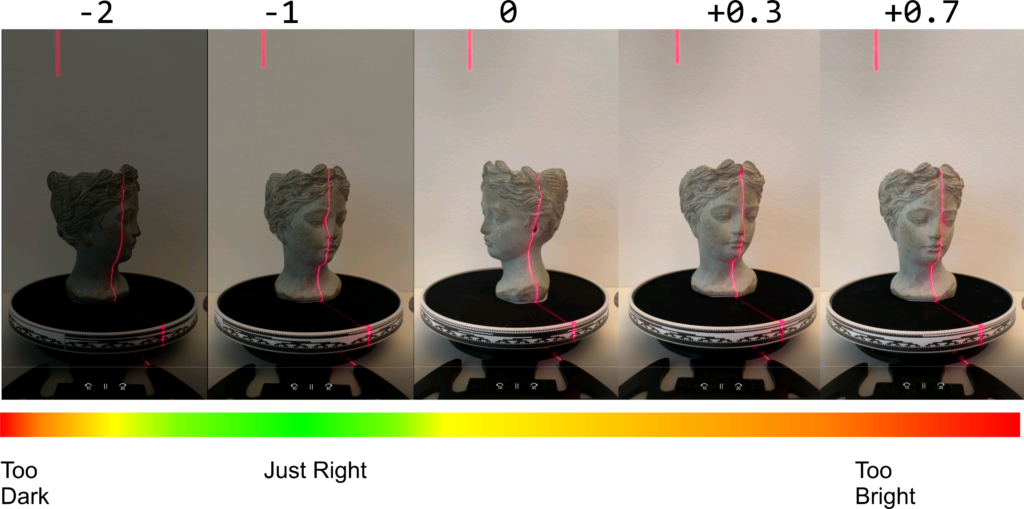
If things are too bright in your room, or you don’t know how to adjust the exposure settings in your phone you should have a look at this FAQ.
Focus at the front of the Turn Table
The Block Code needs to be crisp and sufficiently lit.
If the video controls on your phone prevent you from touching the front of the Block Code Tape to set the focus, click on the object on the Table to prevent your phone from “auto-focussing” on the background.
Spin Slow and Clockwise!
The turn table shipped with ASCAND supports 3 different speeds. ASCAND works best when using the slowest speed set by the middle button marked “SR”.
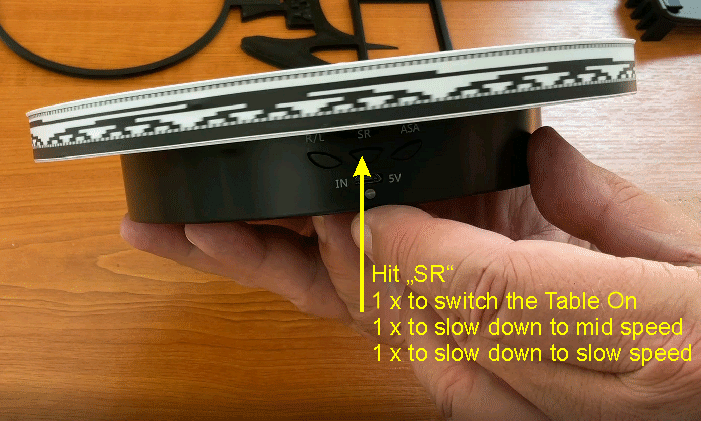
Here is a 20 second video to show you how:
Smooth Operation
Don’t rock the phone while pressing the “Record” button when starting and stopping your video recording. While the ASCAND platform will attempt to make corrections to the Video if it detects a “shaking” video, these corrections are mostly limited to the beginning and the end of the Scan Video. Be extra smooth when turning the laser off while recording the second half of your video.
Bonus Tip: Record 60+ seconds with the Laser ON and turn the Laser OFF for the last 60 seconds without letting your hand get in the way.
We have created some extra routines for optimized outlier removal, that take advantage of an extra turn table spin with the laser being turned off. Make sure that your hand DOES NOT get in the way of the camera recording the Block Code Tape. Keep your hand out of camera sight as much as possible.
If you have difficulties doing this, you can take the battery out of the ASCAND body before you start your Scan Video.
Here is an FAQ that gives you more detail.